
There's dozens of ways to approach smoke FX in Flash, this will cover only a few methods, from these principles you can use these techniques to apply a variety of color and design styles to your smoke animation.
First off, you'll need to draw it all out. Plot out the size and speed in which your smoke will happen. Is it a fast dissipating smoke? A fast impact then slow dissipating dust cloud? Does it never really
 dissipate and only cycles there lingering? I won't cover any fume cycles or heavy fire-based explosions, only techniques to enhance your smoke animation once your classically animated smoke is complete. Before you composite, color, blur and efficiently re-use the elements once created, you must first know what your smoke is supposed to be doing in your scene, then build upon it, polish it off and make it look nice.
All these images are thumbnails of a larger image, click on them if you need a closer
 look of these screen captures.
As an example of a quick double-burst smoke effect, starting off with a more cartoony/stylized design to begin with, you keep your onion skin on and treat it like any other character animation, since this particular sample is quite flat and simplified, it's easy to just draw straight ahead, sometimes you should draw out your most extreme and largest part of the burst, and in-between your way to it. Depending on the spacing between your drawing do you wish to favor to the drawing with the largest volume or keep your timing even and space out your drawings at a relatively equal distance to make a simple (constant speed) smoke dissipation, it's all up to you, here's just one of many ways to approach it, click the play button below to see it looping.

Once you've ruffed out the shape and volume of your smoke bursts and mapped out the timing in which it must come out and dissipate through, you begin to place the final line. In this case a thick black brush line, later to be re-painted a light pale blue. Then go frame by frame to paint it all a white base color. Doesn't matter what colors you choose or what shade your background is, as long as you can clearly see your lines as you trace off those final clean brush strokes, you can easily change the line colors and fill colors later.
 See how the overlapping smoke animations are all separated on their own layers? You can do this as you clean-up your artwork frame by frame so you can re-use elements of this later in different combinations if you wish. Even the cartoony blast out lines are separate and traced with a thick version of the 'line tool' as seen below.
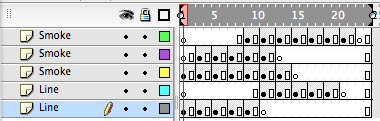


For another sample with different timing see sample below.
This is all on 1s, a fast blast out with a slower dissipation making a smoother effect.
Make certain you use the Edit Multiple Frames button, drag those claws across the time line (make sure to lock your outlines layer first), then Select All and simply choose your new color and it will repaint all frames on all unlocked layers.


Do it again with your outlines layer, locking your base color layer, use a slightly darker or
lighter version of the color you used previously, and presto, you've re-colored your smoke
for the scene it finds itself in.
Adding Blurs
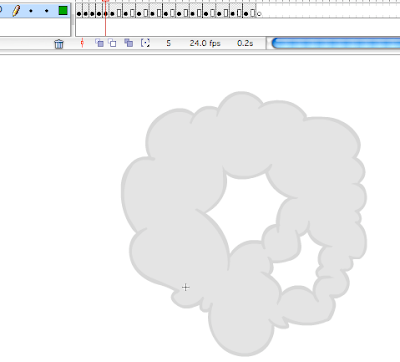
Here we have a puff of smoke that could be used for an object impact to the ground or for a character zipping off screen. Animated stationary, starting off with a small puffy cloud, quickly expanding on 1s, then breaking apart as the gaps grown from the center outwards to make the cloud dissipate slowly on 2s with the spacing between your drawings being very small for the end. Paint it all very light gray with a slightly darker tone for the outlines. Copy these frames and place them into a new symbol.

Now you have a symbol in your library to drag onto the stage, this self-contained looping animation can now have a tint effect placed on to it, (it helps when you chose very light colors to begin with). In the properties window choose Tint or Advanced to play around with the tone and saturation you would like to achieve.
 Once you've picked the color you want, you can open the Filters window under the Windows/Properties menu. Now before you go off making some crazy glows and blurs with Movie Clip Symbols, keep in mind are you doing this for the web or for television? Let's assume you're final render will be for hi-resolution broadcast animation. Because as you may know Movie Clips do not render through video codec, the filters you apply to movie clip symbols only render as SWF files, if so, you have no worries, if you're doing this to render out to Quicktime Video then this is any easy fix, well, easy but potentially time consuming.
First you select all the frames on the layer that has your isolated Graphic Symbol of your smoke dispersal animation.
 Hit F6 to keyframe everything, then go to the beginning and select the first frame. This selects your symbol
 Now frame by frame you must hit Ctrl+F8 to convert to Movie Clip symbol. Repeat the process, in this case it had to be done 28 times, select the frame, Cmd+F8(for mac users) and click OK.
 Now each individual keyframe has been converted to it's own Movie Clip symbol, simply Use the Edit Mulitple Frames button to activate the onion skin range on the timeline, stretch it out to cover all your keys, Select All and go to your filters window. Choose Blur at a value of 10 (or maybe a bit less depending on the size of your effect on screen), and set the Quality to High. Now test render it and see how you like it.

 You can always re-select and change the blur settings to whatever you'd like. Why keyframe every frame? For many reasons, it eliminates the random glitches Flash often has with rendering filters to video (such as drop frames sometimes occur) and it allows you total control to gradually make the blur more or less intense as the animation progresses, you could alter it frame by frame to give the effect of slowly going out of focus or the reverse.
Advancing further, here's a rough smoke blast out, wiping the screen, a great transition effect or for a nice cartoony smoke explosion to camera, the villains blasting in through the wall or a coyote tripping his own booby trap can all have a similar effect, a fast initial blast out followed by a slo-mo build up and then a quick dispersal to reveal the room in ruins or the charred character.
Here's a fast 30 frame version of the same smoke blast all on 1s, instead of the slow 130 frame version from above, this one drops all the frames from the slow build up in the middle to go from the initial blast to the final dissipation. Some animators do all their FX on 1s no matter what, but I find (just like character animation) it can look too smooth and gooey and it limits the power and snappy-ness you can achieve in the timing if you limit yourself to animating on only 1s or ony 2s. 1s and 2s used in combination always works best. Again, there's no secret to the actual animation when you don't worry about too many different tones in your effects, rough it out with outlines first keeping your onion skin ON to see your previous frames and expand your blobs of puffy smoke clouds bigger and bigger as they get closer to camera. Find a point in which each element of your smoke animation starts to break apart on itself, splitting it in the middle and animating the morphing of the clouds into smaller bits that gradually dissipate and fade away.
Here's the same version using the technique shown earlier. Frame by frame selecting all the artwork on each frame and converting to a Movie Clip Symbol. Then selecting all these frames, opening the Filters window and adding a "10" high quality Blur to create a fuzzy/out of focus effect.
Here we have a cleaner version. In this case the thick tappered clean line is inked on a saperate top layer, so that you can easily
Here's the fast version. Using Edit Multiple Frames you can quickly select all the frames on an isolated layer and choose a new color from your palette and it instantly re-paints your smoke tones, do it again for the top outlines layer to give that nice two-tones shaded smoke look.
Here's another sample of a build up, cycle, and dissipate.
In this sample the initial burst is followed by a fast clearing.
Here's some simple alterations to the samples shown above. A simple smoke puff variation, and below that an added burst outward with cartoony stars snapping out to the version shown at the beginning of this post.
Add Transparencies & Layers
Let's start over, this time with some simple shapes, "key pose" some new smoke drawing. Animate on 4s or 6s, then break it down frame by frame.


Once you have it all keyed out, you in-between your drawings, keep the onion skin on so you can achieve a nice smooth transition from pose to pose. Then take the pencil tool and with a thin line, start inking your animation. Make a new layer on top and trace over your work. Keep the rough layer locked and your onion skin on, to make any corrections in volume as
 you clean-up your artwork. The timing/spacing looked like this for this particular spurt of dusty smoke.
Play with the timing, line test your animation with a quick Movie export (SWFs never play in real-time so don't bother unless it's a very small and simple clip).
Once you've cleanned all your animation, you can position, size up, rotate, and convert to a self-contained symbol if you wish. Use the Edit Multiple Frames button (located just below the timeline) to select multiple frames of artwork at once for quick and easy edits in scale, angle, color and line weight of all your artwork.

Now you can paint your animation, take that paint bucket, choose your color and start click-filling frame by frame. Then Edit Multiple Frames button, and choose the Eraser tool on the Erase Lines setting, zoom out of your stage all the way, expand the Edit Multiple Frames range finder on your timeline to cover all your line art and click and drag to erase all the lines on all your frames at once, leaving just the paint. Now you have no outlines on a flat-colored simple smoke animation.

Now you can copy all these frames into a new symbol (if you haven't already). In this particular exercise we'll create two symbols with slightly different versions of smoke animation, this will create more random variety in the final product we are about to create. To produce a semi-transparent, multi-layered smokey effect, you need to use lots of alphas and layers.
Drag these new symbols onto a fresh new timeline, make new layers and scatter them on the timeline, isolating each self-contained Graphic Symbol to its own layer, move the starting keyframes for each new symbol copy you are inserting on the stage. Now make a new key frame at the end timeine for all layers, and randomly move those end frames around. Select-All and now you can change the Alpha to 0% from the Properties Window, then add the tween by selecting a strip of frames on all these new layers, and going to the Properties window again to select Motion tween.


Now you need to start making groups and clusters of these new smoke fade-out symbols together, duplicate seperate smoke symbols (always isolating just one symbol per layer) change the size, rotation and starting point of the animation... make sure all the symbols you make are Graphic symbols, so they'll play when you render them to video and they will loop themselves endlessly to make nice cycles and give the illusion that you have lots of complex smoke animations. Your tome line should look like this, overlapping FX from variously placed and sized smoke symbols, now your simple 18 frame smoke cycle looks more layered and complex.
 Copy these layers to their own new 'Smoke Cloud' symbol.
Now you should have 4 symbols in your library. 'Smoke 1' and 'Smoke 2', your two slightly different smoke puff out cycles, and 'Smoke Cloud' (the symbol with all the tweens of your Smoke1 and two symbols fading out at various sizes and positions) and the 'Smoke Group' symbol that includes various 'Smoke Cloud' symbols starting at various times spread out along the timeline, creating the effect shown above. Confused yet? Symbols within symbols within symbols is the key.
Recap: Isolate your first 18 frame smoke poof out and dissipate animation into a symbol, duplicate that symbol and alter the animation with in that symbol, a few added inbetweens, rotate everything a bit, change the size of it all slightly, change the timing a bit. Now with two versions of smoke cycles, insert them into a new Smoke Cloud symbol. each one isolated on a separate level, adding several new layers with one of the two symbols placed on the stage, overlapping each other, change their size and placement and rotation slightly each time, it should look like a mess of overlayed smoke bundled together, make sure they start at different times within a range of 4 or 5 frames, so layer 1 keyframe on frame 1, layer 2 on top keyframe on frame 3, etc. So the timing is slightly staggered. Now copy all those layers to a new 'Smoke Group' symbol, with this you can duplicate the symbols over and over again, staggering the start time and timing of each one, creating more and more layers on top of each other and placing them in a pattern to create a new 'Smoke Cluster' symbol with all these new groups of stacked on top of them selves. Then Key frame at the end of the timeline all these layers, and place the transparencies of all these symbols on all these last key frames to 0% alpha, add a tween to each layer to create a multiple smoke cluster fade out effect.
Now comes the fun part. Group all that into a new symbol. Now you have a master cluster, clear off your canvas, have a new blank stage with empty layers, and start compiling your smoke clusters on the stage, stacking them around the edge of the screen, you can create any number of grouped cycling smoke screen like this, in this particular case it simulates a nice room-engulfing smoke ... with all the layered alpha smoke it creates almost a nice softened-edges look.


The combinations are endless. keep stacking more clusters together, play with the timing, how long or short the initial 'core symbol' fades away, the size and volume desired for the overall effect, and the ease in editing the initial drawings and shape of your original 18 frame animated burst out cycle will carry through to all your groups and clusters, thus you can substitute entirely new effect in your primary two smoke symbols to produce a brand new FX cycle with a different color and design of smoke altogether. Practice is key with any effects animation. Personally I find it's an even longer experimentation process than character acting to see what works and what doesn't. Instilling life in your effects animation re quires the same sort of studies you would for character animation. Find lots of reference materials, observe life, practice and experiment with timing and spacing. Treat your effects animation like you're animating a character, it requires the same sort of attention, maybe lots more 'trial and error' and happy mistakes are made through the experimental process.
Here's some further short examples of specific circumstances for smoke materialization and dissipation with the Movie Clip/Blur Filter technique added to really give a nice soft look to the classically animated effects in Flash.
Remember to spend plenty of time in the initial designing and timing of your FX piece. Rough it all out with some basic poses, figure out the volume of your effects, how it may interact with the background elements and with the characters, map out the shapes and speed of the effects you're creating and choose your colors wisely. The beauty of Flash is that it can easily and quickly edit your artwork and timing as you go. Path of action, follow-thru, line weight, acceleration and deceleration are all things to keep in mind while animating the FX. Strong design and appropriate color tones are all key for the design of the FX, spend time on this at the beginning. Your effects animation must match the visual style of your characters and backgrounds, you don't want your effects to look like they're from another show with a totally different design style.

That's all for now. Check out the works of Adam Phillips and Michel Gagne for some inspiring effects design and animation!
More tutorials to come soon, please comment on any other specific FX elements you would like to see.
8 comments:
I enjoy too mauch the tutorials from the site, it's high-quality stuff. Please, post more!
I bookmark your page it's quite informative Thanks. Looking forward for more..
Thank you so much! These tutorials are precious. I so much appreciate your affor of sharing your skills. there are not much really helpful stuff on creating animation technique to be found in the Internet. Your blog is in my favourites now. Thanks again from Saint-Peteersburg, Russia!
This is sooooo helpful, thank you!
Do you have any resources for animating a column of smoke (that doesn't disapear, just a continuous loop?)
thx
Really cool
amazing stuff! thanks a lot!
Thanks for the insperation, I have looked at some other smoke effects especially from places that offer packs of these smoke effects, and this is truly a gem post. I like the style, and am currently making some smoke effects myself. I think the water effects will be usefull too! I have done a few fire effects, but am just learning how to actually animate on two's and threes and you say even six's. This is one of the most profesional tutorials on the subject I have seen. I hope that you will continue to enlighten the community with your art. There just aint any tuts out there for this kind of thing.
Wow this is a great blog. Glad i came across it by mistake.
Post a Comment